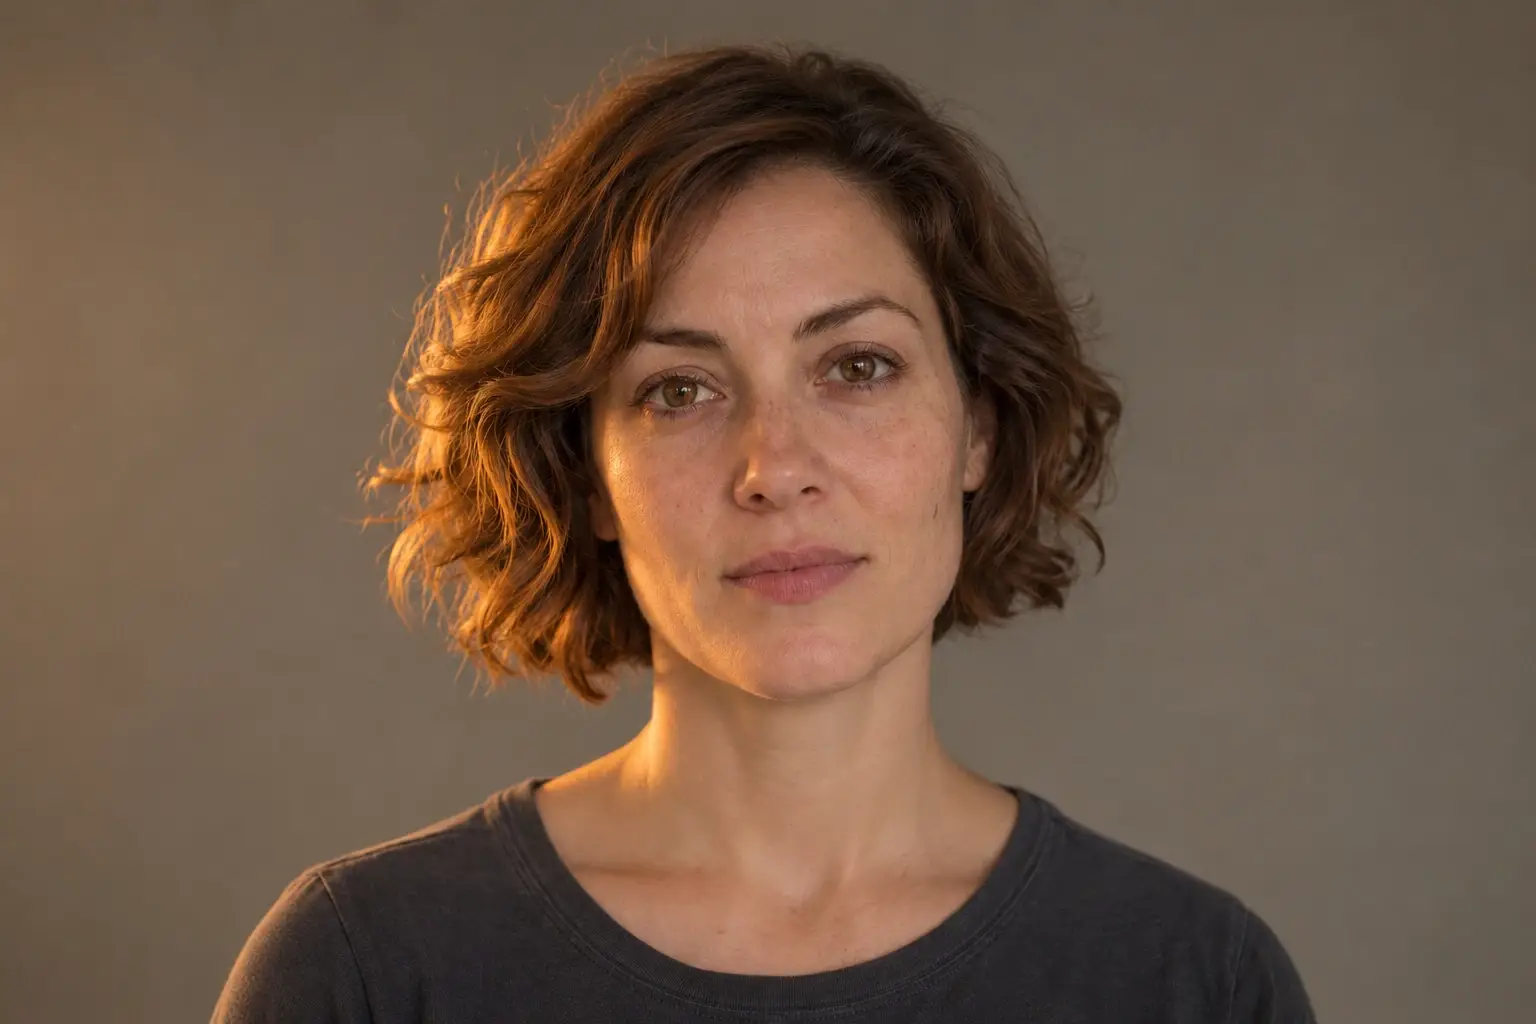
To relight a photo, describe where the light should come from and what it should do to the shadows. A direction and a shadow pattern give you something concrete to check against the original.
Each of the ten techniques below includes a recorded edit and a scene illustration. The recorded edits use two generated references: a portrait and a coffee carafe. The new illustrations cover a wider range of subjects, from a tree at sunset to a mountain valley under broken cloud. Each illustration was generated as two panels in one pass. It shows the lighting goal for a different scene.
The recorded edits were run on 8 November 2026 using Codex’s built-in image generator with the source image attached. The underlying model name was unavailable. The scene illustrations were generated on 9 November 2026. Use their sample instructions on your own uploads, then compare what stayed in place.
Use full lighting instructions
The labels /change-light, /soft-light, /hard-light, /studio-light, /window-light, /golden-hour, /blue-hour, /rim-light, /backlight and /dramatic-light are informal shorthand. Treat them as labels for visual goals. Upload the image and use the full instruction.
- Attach a source you own or have permission to edit.
- Choose one lighting target. State its direction, softness, colour and shadow pattern.
- Name the subject features, object geometry, viewpoint and crop that should remain.
- Compare both images at the same scale. Check eyes, hair, outlines, reflections and background objects before accepting the result.
OpenAI's image-generation guidance recommends targeted revisions and explicit preservation instructions. Its image-prompting guide recommends checking the output against your brief. The examples below apply that approach and report visible departures as well as the intended effect.
Adobe's portrait-lighting guidance discusses how more direct light can create stronger contrast, while diffused and fill lighting can soften a portrait's shadows. The generated examples use that vocabulary as visual direction, without claiming a calibrated camera or lighting simulation.
Copy the reusable relighting template
Open the editable reference-photo relighting prompt. Its default reproduces the instruction used for the recorded golden-hour portrait below. The prompt page includes all ten scene recipes and both sets of comparisons.
Use the attached image as the source image and edit target. Change only the illumination to [sunset light]. Preserve [scene details], the original camera position, perspective and landscape crop. Adjust the existing shadows, highlights, reflections and colour cast to match the requested lighting. Keep the subject recognizable and important detail readable. Apply changes only to surfaces and light; do not add or remove objects, people, signs, words, logos or watermarks. Return one landscape 3:2 image. This is an illustrative relighting edit, not evidence of real lighting conditions or an unchanged photograph.
For a new attempt, return to the original input to keep your comparison clean. Feeding an already edited result into another edit makes it harder to separate a new lighting change from earlier drift.
Create the practice inputs
1. /change-light: Change the lighting mood
Lighting objective. Shift the scene from neutral daylight to low warm side light.
Replace a vague mood label with a colour, direction and fill level. This example deliberately requests a blue key light rather than asking the model to choose a mood.
Edit prompt used
Use the attached image as the source image and edit target. Change only the illumination to a cool blue key light from frame right with a weaker neutral fill from frame left; keep the face readable and the background muted, without adding a lamp. Preserve the fictional woman's facial proportions, expression, brown eyes, freckles, short brown wavy hair, charcoal shirt, pose and plain background, the original camera position, perspective and landscape crop. Adjust the existing shadows, highlights, reflections and colour cast to match the requested lighting. Keep the subject recognizable and important detail readable. Apply changes only to surfaces and light; do not add or remove objects, people, signs, words, logos or watermarks. Return one landscape 3:2 image. This is an illustrative relighting edit, not evidence of real lighting conditions or an unchanged photograph.
/change-light — original generated input
The unchanged portrait reference supplied to this edit.
/change-light — relit result
The right side of the face, hair and shirt picks up blue illumination while neutral light keeps the opposite side readable.
What changed
The right side of the face, hair and shirt picks up blue illumination while neutral light keeps the opposite side readable. The background also cools. Small hair strands and skin details shift, and the new colour makes apparent eye colour harder to judge.
Lone tree lighting example
Look for a consistent shift in the lit side of the trunk, the grass and the direction of the cast shadow.
Prompt to try on your own image
Use the attached image as the source image and edit target. Change only the illumination to low amber sunlight entering from frame right, warming one side of the tree and throwing a long shadow to frame left. Preserve tree silhouette, branch positions, horizon, ridge and crop, the original camera position, perspective and landscape crop. Adjust the existing shadows, highlights, reflections and colour cast to match the requested lighting. Keep the subject recognizable and important detail readable. Apply changes only to surfaces and light; do not add or remove objects, people, signs, words, logos or watermarks. Return one landscape 3:2 image. This is an illustrative relighting edit, not evidence of real lighting conditions or an unchanged photograph.
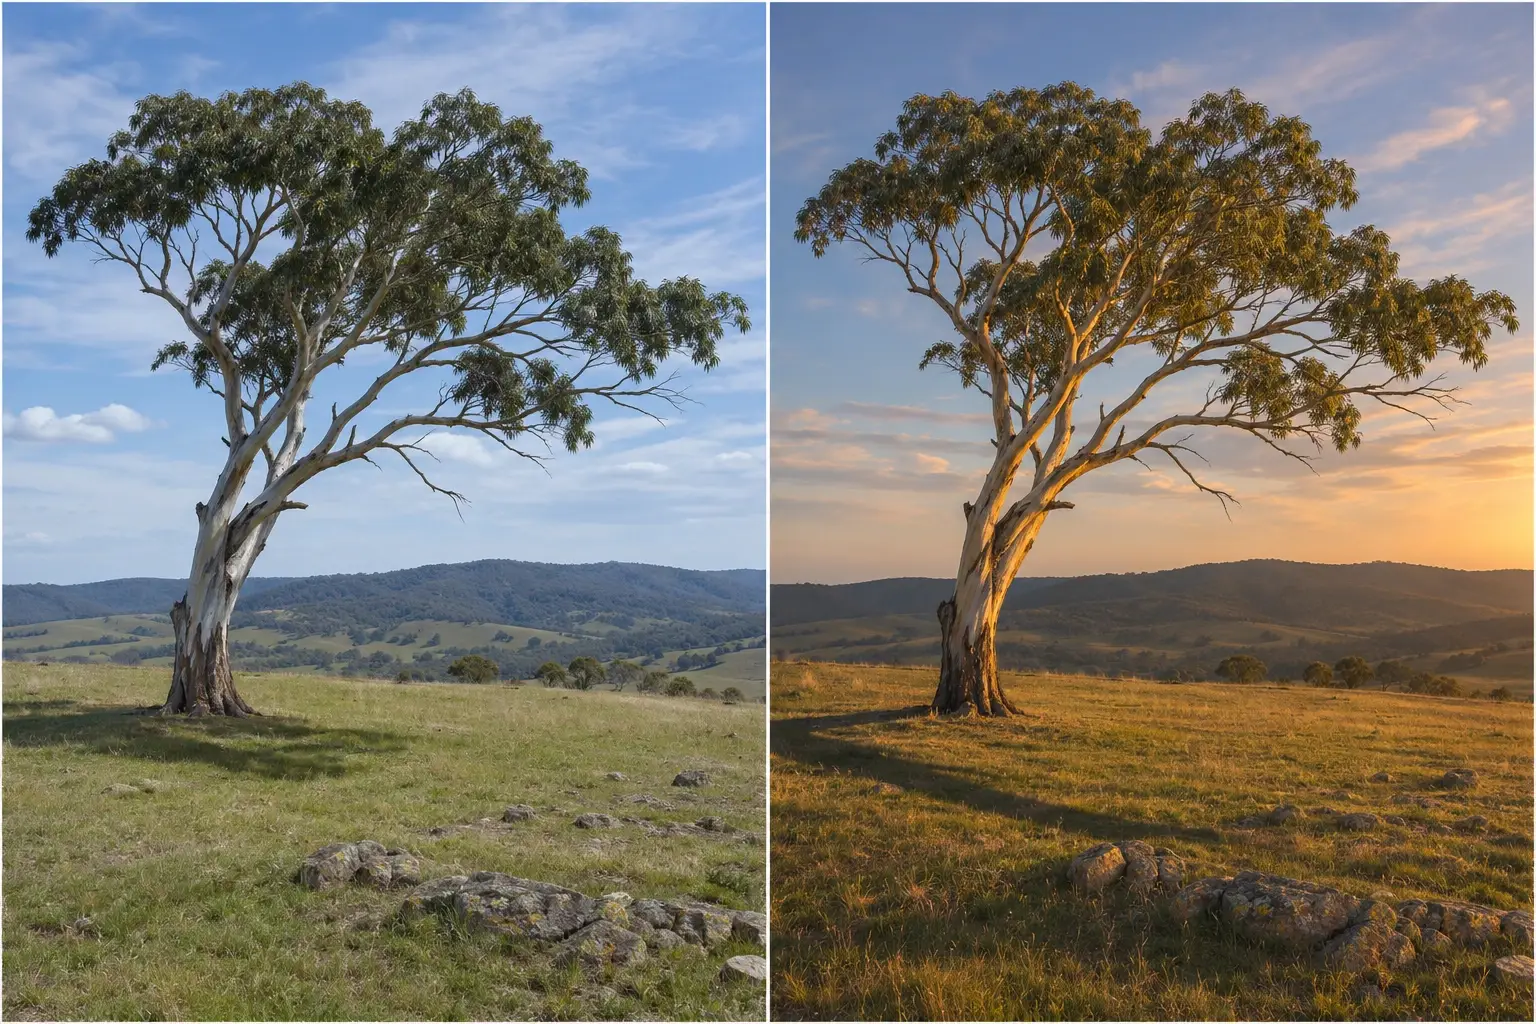
The trunk and grass warm together. Small branches and some cloud shapes differ between panels.
2. /soft-light: Use broad, soft illumination
Lighting objective. Soften shadow transitions while keeping petal detail.
Ask for broad diffused light when you want gradual shadow transitions. Preserve skin texture explicitly so softness refers to the illumination rather than airbrushing.
Edit prompt used
Use the attached image as the source image and edit target. Change only the illumination to a broad diffused neutral light from high frame left, with gentle transitions between light and shadow and subtle catchlights; preserve natural skin texture. Preserve the fictional woman's facial proportions, expression, brown eyes, freckles, short brown wavy hair, charcoal shirt, pose and plain background, the original camera position, perspective and landscape crop. Adjust the existing shadows, highlights, reflections and colour cast to match the requested lighting. Keep the subject recognizable and important detail readable. Apply changes only to surfaces and light; do not add or remove objects, people, signs, words, logos or watermarks. Return one landscape 3:2 image. This is an illustrative relighting edit, not evidence of real lighting conditions or an unchanged photograph.
/soft-light — original generated input
The unchanged portrait reference supplied to this edit.
/soft-light — relit result
Light and shade blend gently across the face, with a brighter left side and natural-looking skin texture.
What changed
Light and shade blend gently across the face, with a brighter left side and natural-looking skin texture. The change is subtle because the baseline was already softly lit. A dramatic difference would not be the right measure of success here.
Flower close-up lighting example
Compare the edges of petal shadows and check that fine veins are still visible.
Prompt to try on your own image
Use the attached image as the source image and edit target. Change only the illumination to broad diffuse light from above and frame left, with smooth transitions across the pale petals and restrained highlights. Preserve flower position, petal shape and fine veins, center, framing and foliage, the original camera position, perspective and landscape crop. Adjust the existing shadows, highlights, reflections and colour cast to match the requested lighting. Keep the subject recognizable and important detail readable. Apply changes only to surfaces and light; do not add or remove objects, people, signs, words, logos or watermarks. Return one landscape 3:2 image. This is an illustrative relighting edit, not evidence of real lighting conditions or an unchanged photograph.
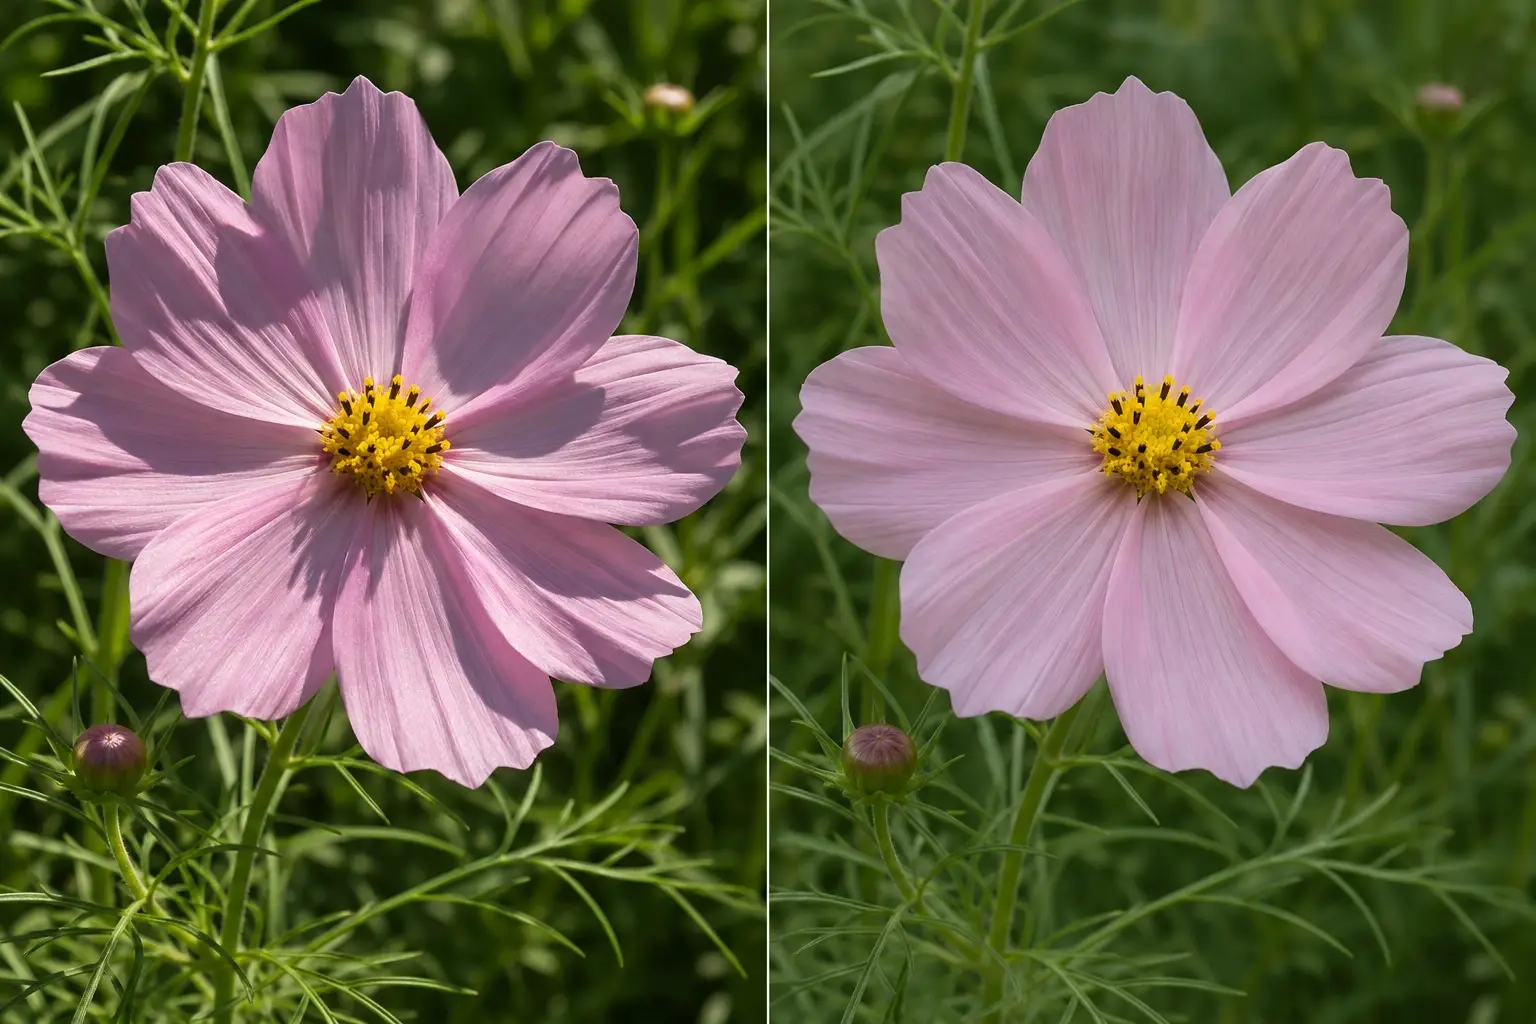
The petal shadows soften and the veins remain visible. A few petal outlines and background stems shift.
3. /hard-light: Create defined shadows
Lighting objective. Give a portrait crisp, directional shadows.
Describe a small direct source and the shadow it should produce. Keep the shadow-side eye readable if the result still needs to function as a portrait.
Edit prompt used
Use the attached image as the source image and edit target. Change only the illumination to a small direct neutral light from high frame left, creating a crisp nose shadow toward frame right and strong facial modelling; retain visible detail in the shadow-side eye. Preserve the fictional woman's facial proportions, expression, brown eyes, freckles, short brown wavy hair, charcoal shirt, pose and plain background, the original camera position, perspective and landscape crop. Adjust the existing shadows, highlights, reflections and colour cast to match the requested lighting. Keep the subject recognizable and important detail readable. Apply changes only to surfaces and light; do not add or remove objects, people, signs, words, logos or watermarks. Return one landscape 3:2 image. This is an illustrative relighting edit, not evidence of real lighting conditions or an unchanged photograph.
/hard-light — original generated input
The unchanged portrait reference supplied to this edit.
/hard-light — relit result
A clear diagonal nose shadow and stronger cheek shadow make this distinct from the soft-light result.
What changed
A clear diagonal nose shadow and stronger cheek shadow make this distinct from the soft-light result. Both eyes remain visible, but fine skin and hair details change. The image demonstrates a harder-looking light rather than a measured photographic simulation.
Portrait lighting example
Look for a sharply defined shadow from the nose and a readable eye on the shaded side.
Prompt to try on your own image
Use the attached image as the source image and edit target. Change only the illumination to a small hard key light from high frame left, with a clearly defined nose shadow and diagonal window-blind shadows across the background, keeping both eyes legible. Preserve identity, expression, hair, clothing, viewpoint, crop and background geometry, the original camera position, perspective and landscape crop. Adjust the existing shadows, highlights, reflections and colour cast to match the requested lighting. Keep the subject recognizable and important detail readable. Apply changes only to surfaces and light; do not add or remove objects, people, signs, words, logos or watermarks. Return one landscape 3:2 image. This is an illustrative relighting edit, not evidence of real lighting conditions or an unchanged photograph.
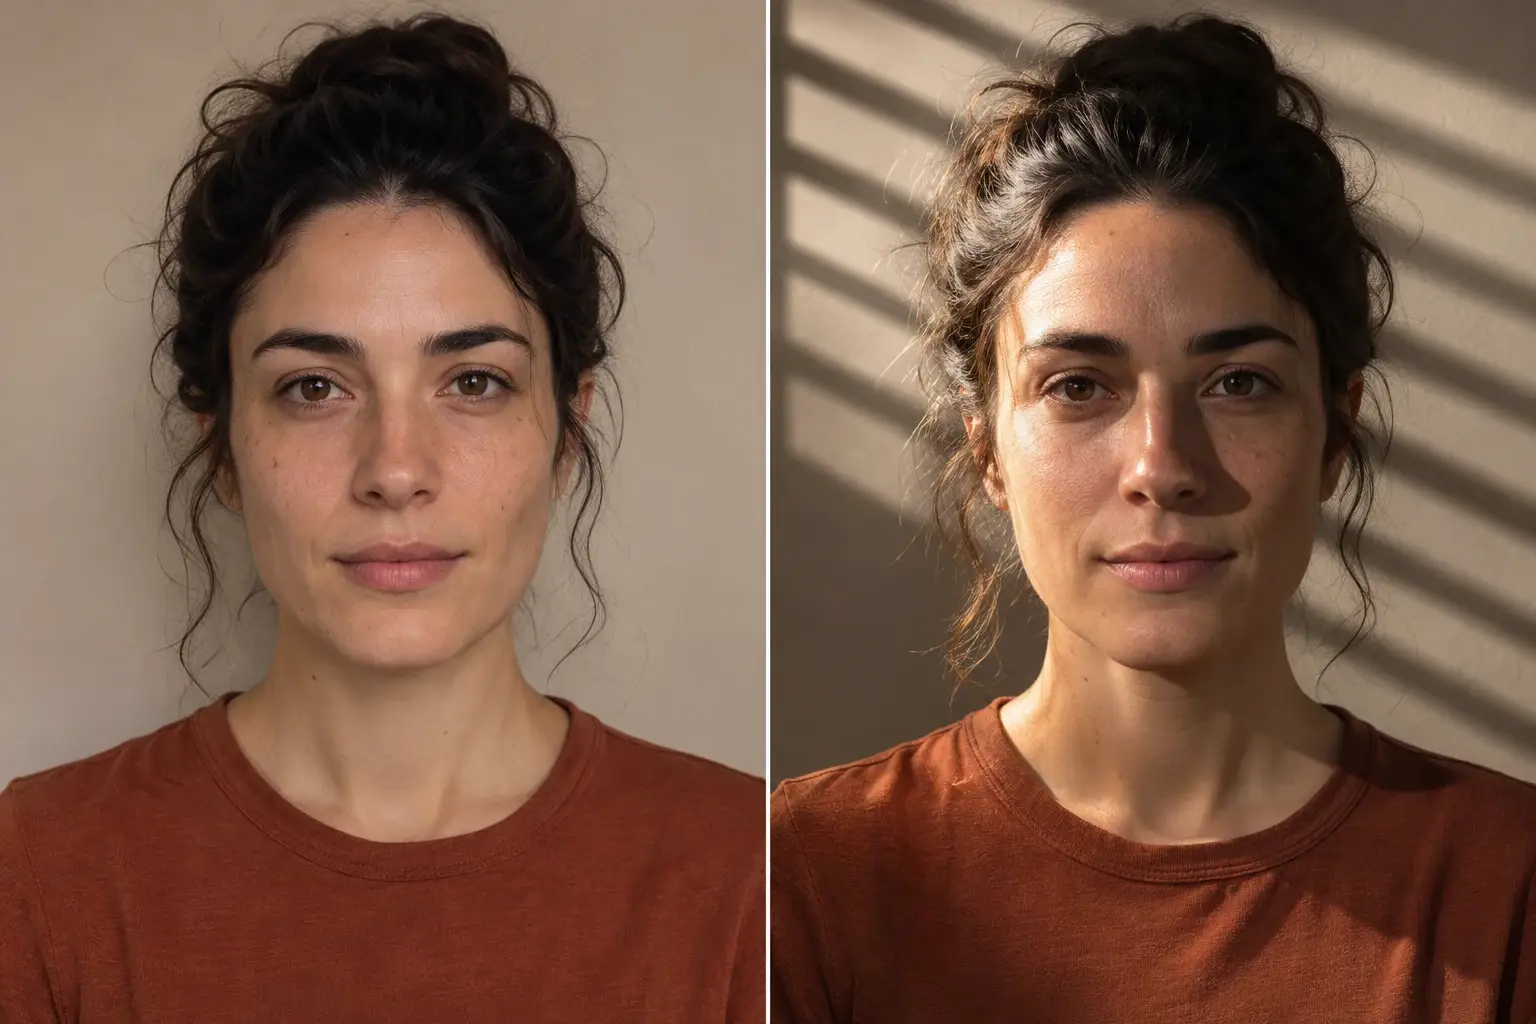
The nose shadow and diagonal bands are clearer on the right. Both eyes remain visible, with some changes in hair and fabric.
4. /studio-light: Give a product a clean studio finish
Lighting objective. Use a key and fill to reveal surface and form.
For a product, specify the key, fill and reflections you want to see. Keep light stands and softboxes outside the scene unless they are part of the brief.
Edit prompt used
Use the attached image as the source image and edit target. Change only the illumination to a large soft studio key from frame left, a weaker fill from frame right and controlled highlight strips on the existing metal and glass; keep the background quiet and add no visible lighting equipment. Preserve the carafe and filter geometry, handle, glass transparency, coffee level, existing objects, counter and background, the original camera position, perspective and landscape crop. Adjust the existing shadows, highlights, reflections and colour cast to match the requested lighting. Keep the subject recognizable and important detail readable. Apply changes only to surfaces and light; do not add or remove objects, people, signs, words, logos or watermarks. Return one landscape 3:2 image. This is an illustrative relighting edit, not evidence of real lighting conditions or an unchanged photograph.
/studio-light — original generated input
The unchanged product reference supplied to this edit.
/studio-light — relit result
The carafe has cleaner highlight strips on its glass and metal, with stronger separation from the counter.
What changed
The carafe has cleaner highlight strips on its glass and metal, with stronger separation from the counter. Its handle and main components stay recognizable. The filter texture, glass droplets and reflections are also reinterpreted, so this is a fictional product-lighting study.
Sculpture lighting example
The bright side should retain plaster texture, and the shadow under the jaw should still have detail.
Prompt to try on your own image
Use the attached image as the source image and edit target. Change only the illumination to a broad softbox-style key high at frame left with weak fill from the right, so the cheekbone and neck have readable tonal gradients and the textured plaster retains detail. Preserve sculpture shape, surface texture, plinth, backdrop and viewpoint, the original camera position, perspective and landscape crop. Adjust the existing shadows, highlights, reflections and colour cast to match the requested lighting. Keep the subject recognizable and important detail readable. Apply changes only to surfaces and light; do not add or remove objects, people, signs, words, logos or watermarks. Return one landscape 3:2 image. This is an illustrative relighting edit, not evidence of real lighting conditions or an unchanged photograph.
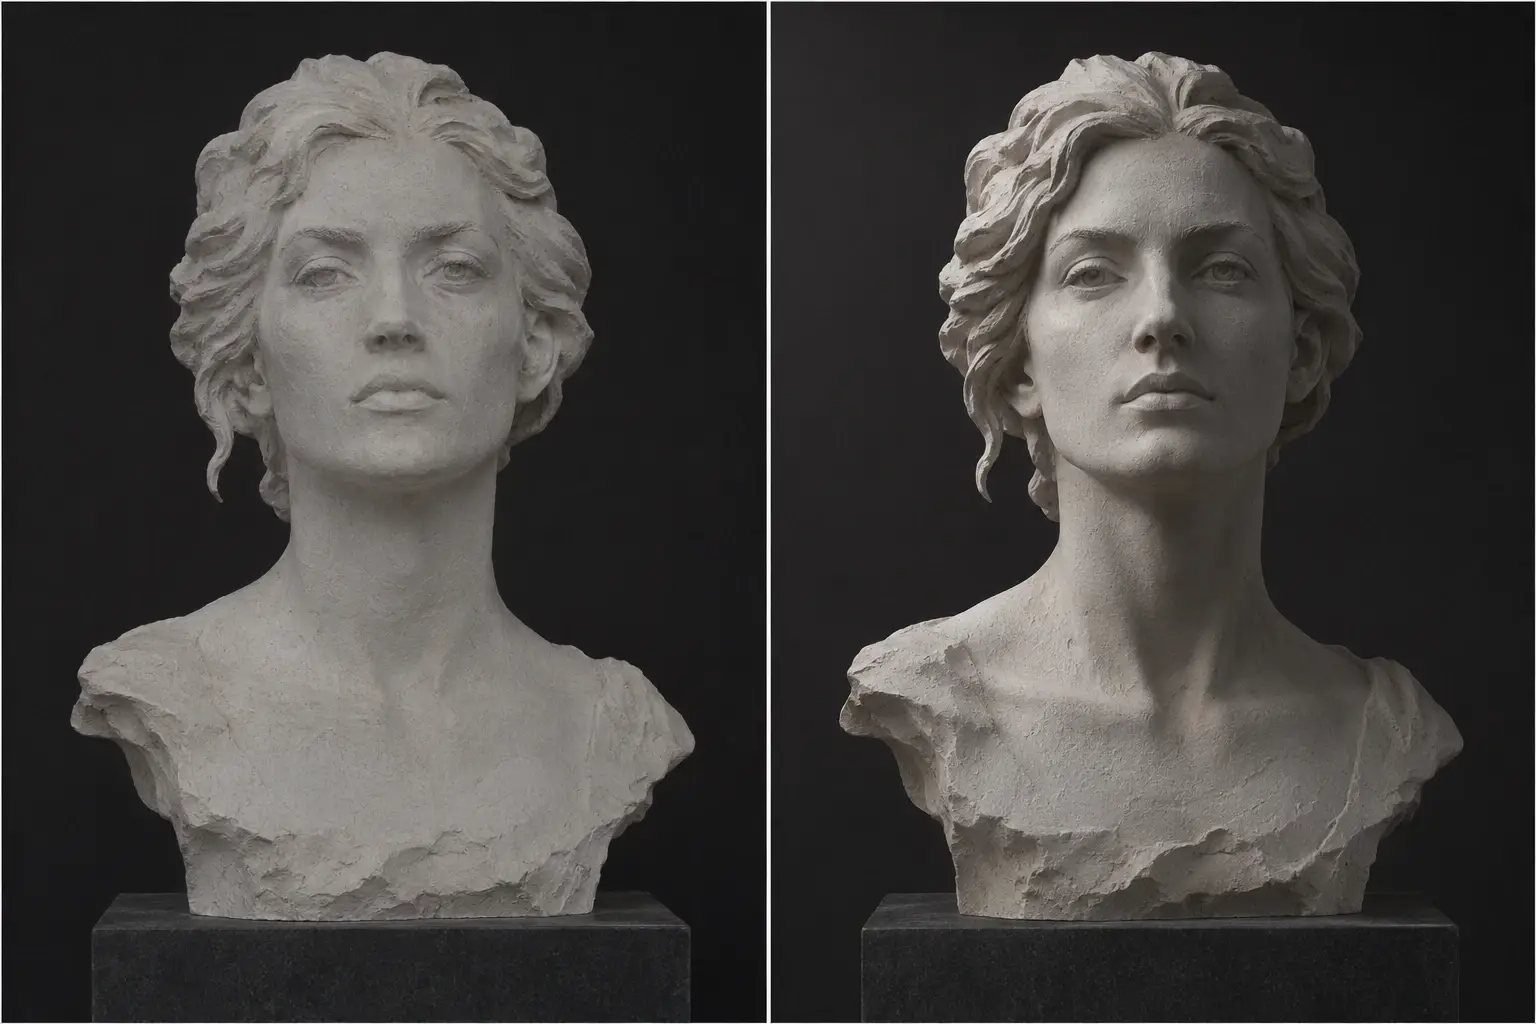
The cheek and neck gain clearer contours. Small sculpted features shift slightly between panels.
5. /window-light: Suggest natural window light
Lighting objective. Make an existing window read as the source.
Say where the window light comes from and whether the window itself belongs in frame. Here it stays off-frame so the original plain setting can remain.
Edit prompt used
Use the attached image as the source image and edit target. Change only the illumination to broad neutral daylight entering through an off-frame window at frame left, with a gradual shadow across the far cheek and soft background falloff; do not add a window or change the room. Preserve the fictional woman's facial proportions, expression, brown eyes, freckles, short brown wavy hair, charcoal shirt, pose and plain background, the original camera position, perspective and landscape crop. Adjust the existing shadows, highlights, reflections and colour cast to match the requested lighting. Keep the subject recognizable and important detail readable. Apply changes only to surfaces and light; do not add or remove objects, people, signs, words, logos or watermarks. Return one landscape 3:2 image. This is an illustrative relighting edit, not evidence of real lighting conditions or an unchanged photograph.
/window-light — original generated input
The unchanged portrait reference supplied to this edit.
/window-light — relit result
The left side of the face and hair is brighter, with a gradual falloff toward the far cheek.
What changed
The left side of the face and hair is brighter, with a gradual falloff toward the far cheek. No window appears in the frame. It resembles the soft-light version, showing that these labels can describe overlapping results rather than separate effects.
Indoor plant lighting example
Check whether the brighter leaves and floor shadows agree with the window position.
Prompt to try on your own image
Use the attached image as the source image and edit target. Change only the illumination to soft daylight through the existing window on frame right, gently brightening the leaves facing the glass and casting a soft shadow across the floor. Preserve window and mullion geometry, leaf positions, plant pot, floorboards and framing, the original camera position, perspective and landscape crop. Adjust the existing shadows, highlights, reflections and colour cast to match the requested lighting. Keep the subject recognizable and important detail readable. Apply changes only to surfaces and light; do not add or remove objects, people, signs, words, logos or watermarks. Return one landscape 3:2 image. This is an illustrative relighting edit, not evidence of real lighting conditions or an unchanged photograph.
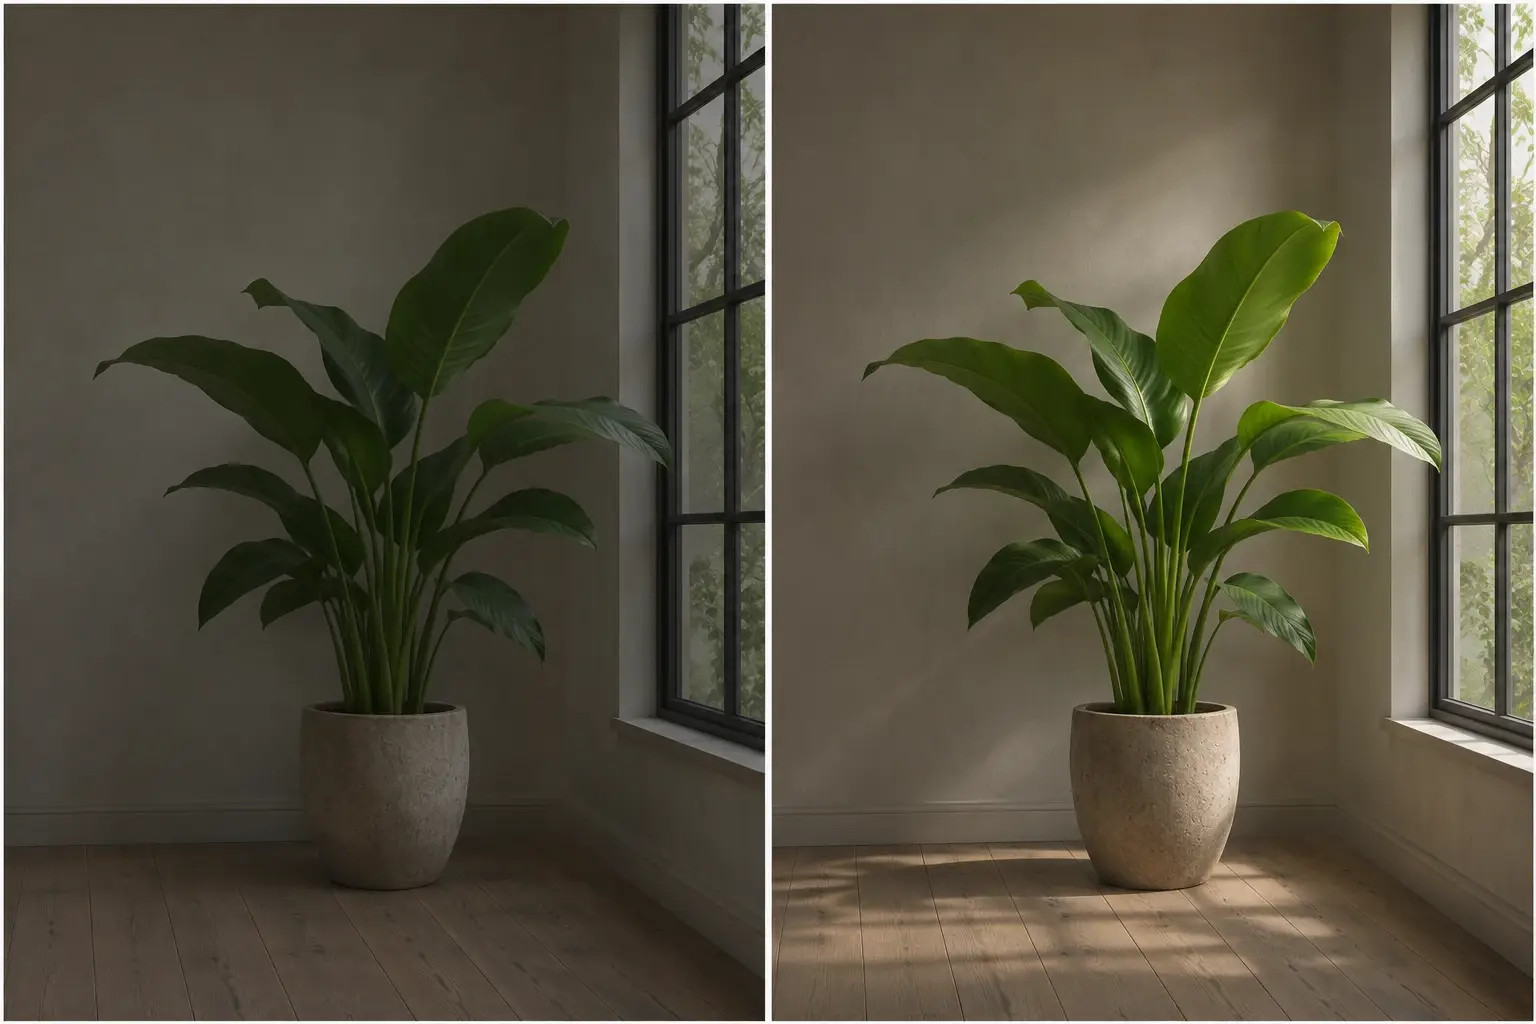
The window-facing leaves brighten and a patch of light reaches the floor. Some leaf shapes differ.
6. /golden-hour: Add warm low-angle light
Lighting objective. Give an outdoor scene low, warm late-day light.
Describe low warm light and protect the background. You can request the visual character of golden hour without asking the model to relocate an indoor subject.
Edit prompt used
Use the attached image as the source image and edit target. Change only the illumination to low warm sunlight from frame left, a gentle amber edge on the hair and a weak neutral fill on the face; suggest late-afternoon warmth without moving the subject outdoors or applying a uniform orange filter. Preserve the fictional woman's facial proportions, expression, brown eyes, freckles, short brown wavy hair, charcoal shirt, pose and plain background, the original camera position, perspective and landscape crop. Adjust the existing shadows, highlights, reflections and colour cast to match the requested lighting. Keep the subject recognizable and important detail readable. Apply changes only to surfaces and light; do not add or remove objects, people, signs, words, logos or watermarks. Return one landscape 3:2 image. This is an illustrative relighting edit, not evidence of real lighting conditions or an unchanged photograph.
/golden-hour — original generated input
The unchanged portrait reference supplied to this edit.
/golden-hour — relit result
Warm amber light catches the left hair, cheek, neck and shoulder while the face remains readable.
What changed
Warm amber light catches the left hair, cheek, neck and shoulder while the face remains readable. The neutral setting stays in place. The effect suggests low warm sunlight; it does not establish a real time of day, and fine facial details still shift.
Coastal lighthouse lighting example
The lighthouse and rock should warm on the same side, while the coast remains recognizable.
Prompt to try on your own image
Use the attached image as the source image and edit target. Change only the illumination to low amber sun from the seaward side, warm light on the headland and lighthouse, long natural shadows and a warm horizon. Preserve lighthouse design, path, headland silhouette, waterline and horizon, the original camera position, perspective and landscape crop. Adjust the existing shadows, highlights, reflections and colour cast to match the requested lighting. Keep the subject recognizable and important detail readable. Apply changes only to surfaces and light; do not add or remove objects, people, signs, words, logos or watermarks. Return one landscape 3:2 image. This is an illustrative relighting edit, not evidence of real lighting conditions or an unchanged photograph.
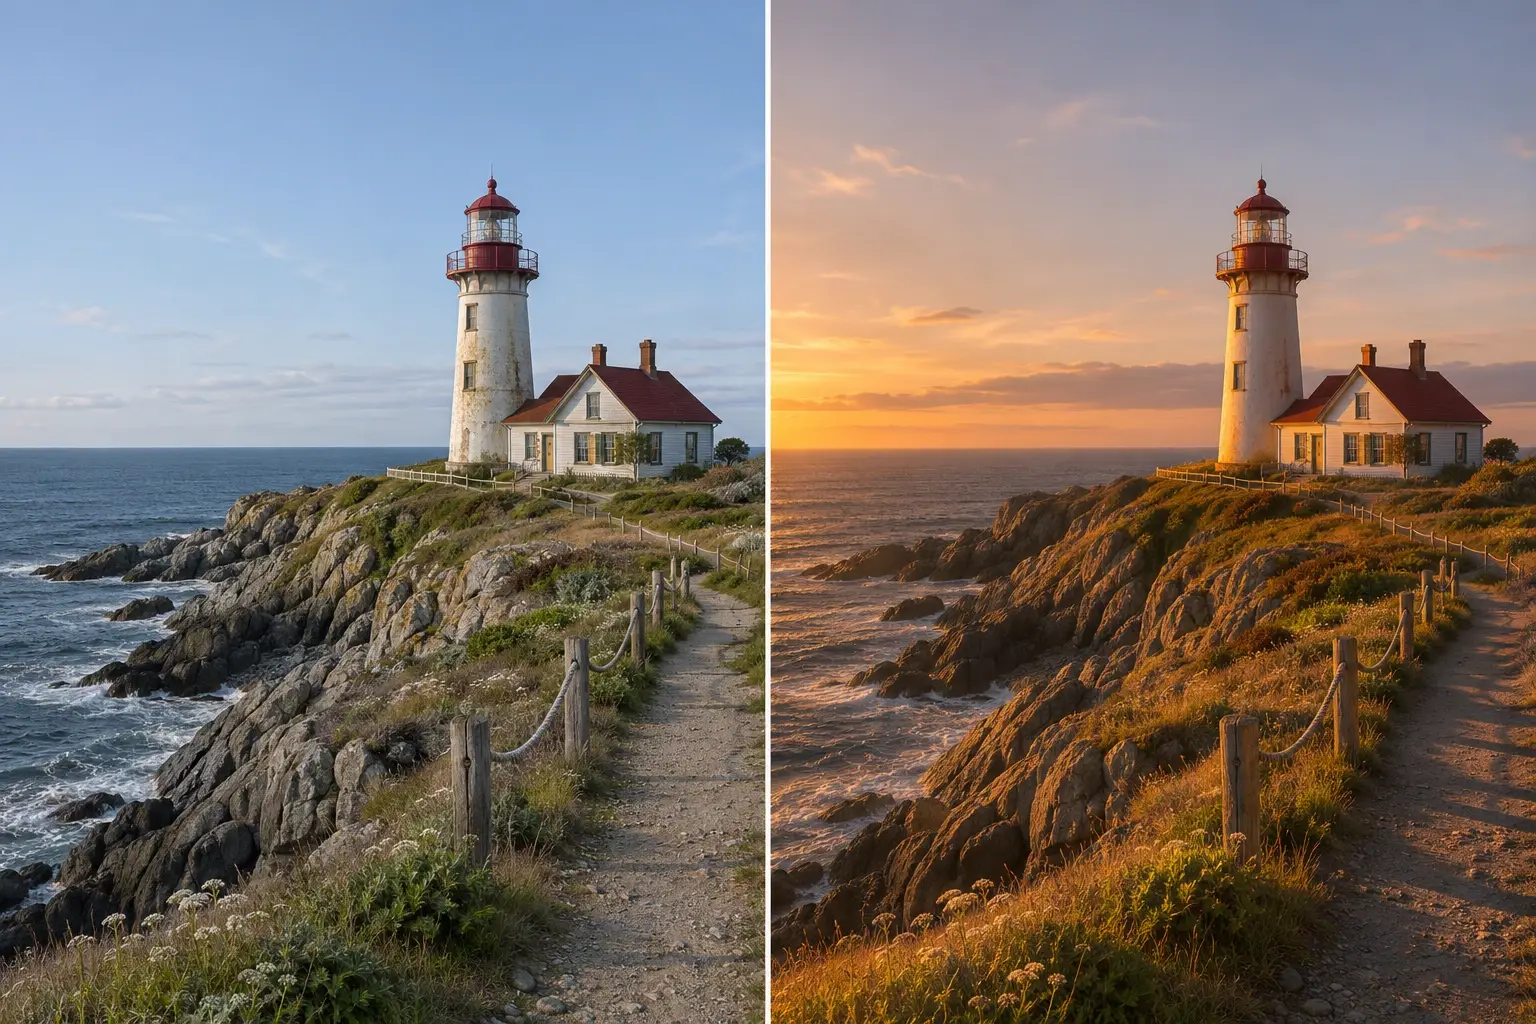
The warm light hits the rocks and lighthouse together. Fine wave and cloud shapes differ.
7. /blue-hour: Create a cool evening impression
Lighting objective. Cool the ambient light while keeping warm lamps readable.
Request a cool ambient cast and a modest brightness change. Include enough facial fill to keep a moody result usable.
Edit prompt used
Use the attached image as the source image and edit target. Change only the illumination to soft cool blue ambient light with a faint neutral key on the face, lower overall brightness and readable eyes; suggest an evening mood without replacing the background or adding a sky. Preserve the fictional woman's facial proportions, expression, brown eyes, freckles, short brown wavy hair, charcoal shirt, pose and plain background, the original camera position, perspective and landscape crop. Adjust the existing shadows, highlights, reflections and colour cast to match the requested lighting. Keep the subject recognizable and important detail readable. Apply changes only to surfaces and light; do not add or remove objects, people, signs, words, logos or watermarks. Return one landscape 3:2 image. This is an illustrative relighting edit, not evidence of real lighting conditions or an unchanged photograph.
/blue-hour — original generated input
The unchanged portrait reference supplied to this edit.
/blue-hour — relit result
The background, shirt and hair become cooler and darker while a faint neutral light leaves the eyes readable.
What changed
The background, shirt and hair become cooler and darker while a faint neutral light leaves the eyes readable. No sky or outdoor scene is added. It is an evening-style colour and brightness treatment, with changes to small texture details.
Dome at dusk lighting example
Look for cool sky and stone, localized warm lamps and a dome that still reads clearly.
Prompt to try on your own image
Use the attached image as the source image and edit target. Change only the illumination to cool cobalt twilight with slightly reduced ambient brightness, preserving restrained warm lamp glow and readable stone texture. Preserve dome, windows, lamp positions, square layout and camera perspective, the original camera position, perspective and landscape crop. Adjust the existing shadows, highlights, reflections and colour cast to match the requested lighting. Keep the subject recognizable and important detail readable. Apply changes only to surfaces and light; do not add or remove objects, people, signs, words, logos or watermarks. Return one landscape 3:2 image. This is an illustrative relighting edit, not evidence of real lighting conditions or an unchanged photograph.
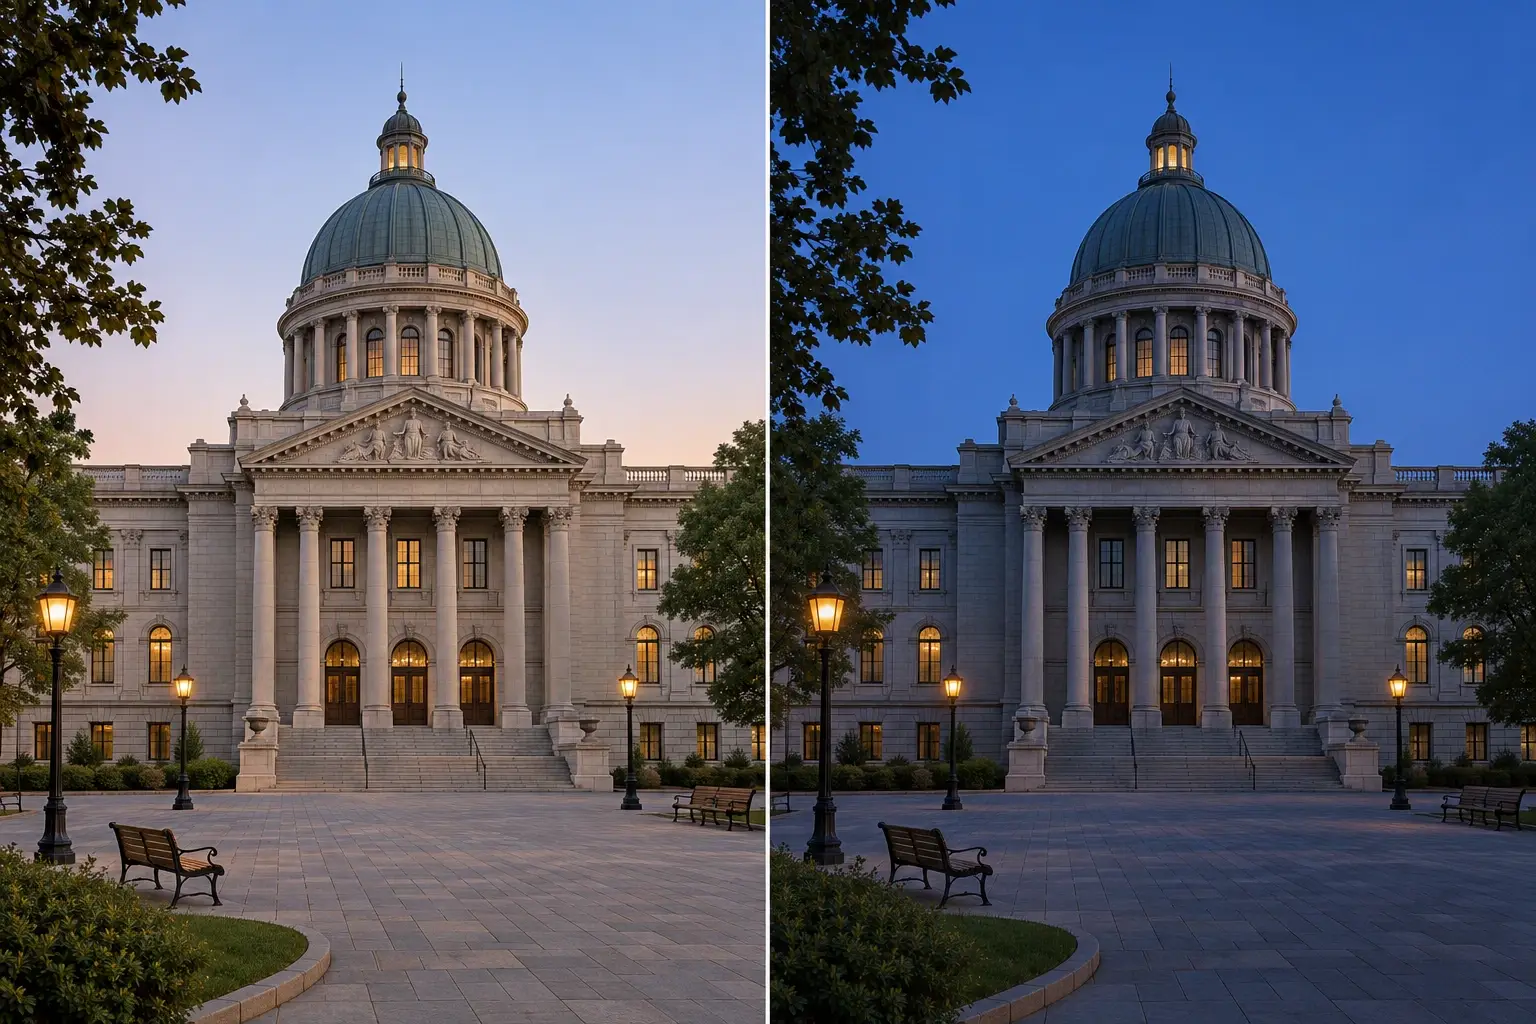
The sky cools and the warm lamps remain visible. Stone detail stays legible on the shaded facade.
8. /rim-light: Separate the subject from the background
Lighting objective. Trace an edge to separate the subject from the background.
Keep a front key and add a narrow light behind one side. The intended change is an outline along hair and shoulder rather than a glowing face.
Edit prompt used
Use the attached image as the source image and edit target. Change only the illumination to a narrow warm rim from behind at frame right along the hair and shoulder, while keeping a soft neutral front key so the face remains properly visible; do not turn the whole face into a silhouette. Preserve the fictional woman's facial proportions, expression, brown eyes, freckles, short brown wavy hair, charcoal shirt, pose and plain background, the original camera position, perspective and landscape crop. Adjust the existing shadows, highlights, reflections and colour cast to match the requested lighting. Keep the subject recognizable and important detail readable. Apply changes only to surfaces and light; do not add or remove objects, people, signs, words, logos or watermarks. Return one landscape 3:2 image. This is an illustrative relighting edit, not evidence of real lighting conditions or an unchanged photograph.
/rim-light — original generated input
The unchanged portrait reference supplied to this edit.
/rim-light — relit result
A narrow warm outline appears along the right hair and shoulder, with neutral light still on the front of the face.
What changed
A narrow warm outline appears along the right hair and shoulder, with neutral light still on the front of the face. This separates the subject without turning it into a silhouette. Some strands along the lit boundary are redrawn.
Profile portrait lighting example
Look for a narrow highlight at the bun and shoulder with the original face light still readable.
Prompt to try on your own image
Use the attached image as the source image and edit target. Change only the illumination to the same faint face light plus a narrow warm rear-side light tracing the bun and shoulder, without washing the profile in a broad glow. Preserve profile, bun, expression, clothing, crop and background, the original camera position, perspective and landscape crop. Adjust the existing shadows, highlights, reflections and colour cast to match the requested lighting. Keep the subject recognizable and important detail readable. Apply changes only to surfaces and light; do not add or remove objects, people, signs, words, logos or watermarks. Return one landscape 3:2 image. This is an illustrative relighting edit, not evidence of real lighting conditions or an unchanged photograph.
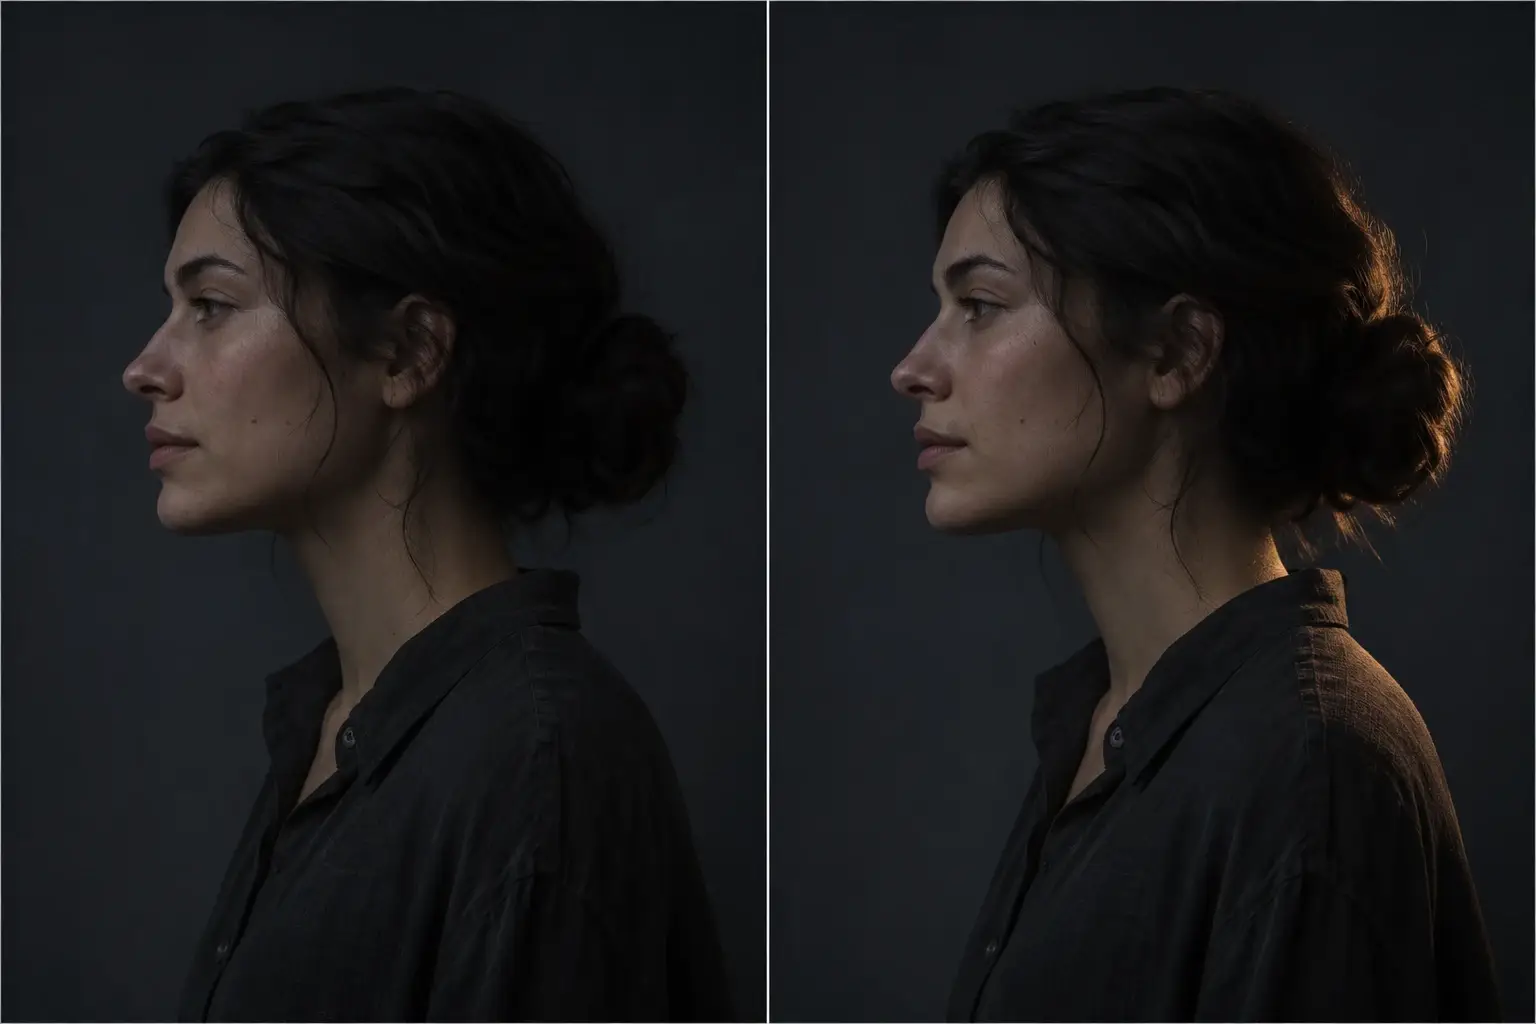
The rear edge of the hair lights up without a broad halo. The shoulder highlight is much subtler.
9. /backlight: Place the main light behind the subject
Lighting objective. Make a rear light visible through thin petals.
Move the dominant source behind the subject, then specify how much face detail to retain. Watch for excessive flare or an oversized halo.
Edit prompt used
Use the attached image as the source image and edit target. Change only the illumination to a strong warm source behind the head and slightly to frame left, producing a luminous hair outline and a darker face with gentle neutral fill; preserve readable facial features and avoid excessive flare. Preserve the fictional woman's facial proportions, expression, brown eyes, freckles, short brown wavy hair, charcoal shirt, pose and plain background, the original camera position, perspective and landscape crop. Adjust the existing shadows, highlights, reflections and colour cast to match the requested lighting. Keep the subject recognizable and important detail readable. Apply changes only to surfaces and light; do not add or remove objects, people, signs, words, logos or watermarks. Return one landscape 3:2 image. This is an illustrative relighting edit, not evidence of real lighting conditions or an unchanged photograph.
/backlight — original generated input
The unchanged portrait reference supplied to this edit.
/backlight — relit result
A broader golden halo surrounds the hair and a warm glow appears behind the head.
What changed
A broader golden halo surrounds the hair and a warm glow appears behind the head. The face is darker than in the rim-light result but remains visible. The large glow and fine hair changes are worth checking if you need a restrained edit.
Daisy lighting example
Check for translucency around the petals and partial shade on the front of the flower.
Prompt to try on your own image
Use the attached image as the source image and edit target. Change only the illumination to warm light centered behind the flower, with translucent petal edges and softly glowing meadow highlights, leaving the center readable in partial shade. Preserve petal count and arrangement as closely as possible, flower center, stem, framing and background layout, the original camera position, perspective and landscape crop. Adjust the existing shadows, highlights, reflections and colour cast to match the requested lighting. Keep the subject recognizable and important detail readable. Apply changes only to surfaces and light; do not add or remove objects, people, signs, words, logos or watermarks. Return one landscape 3:2 image. This is an illustrative relighting edit, not evidence of real lighting conditions or an unchanged photograph.
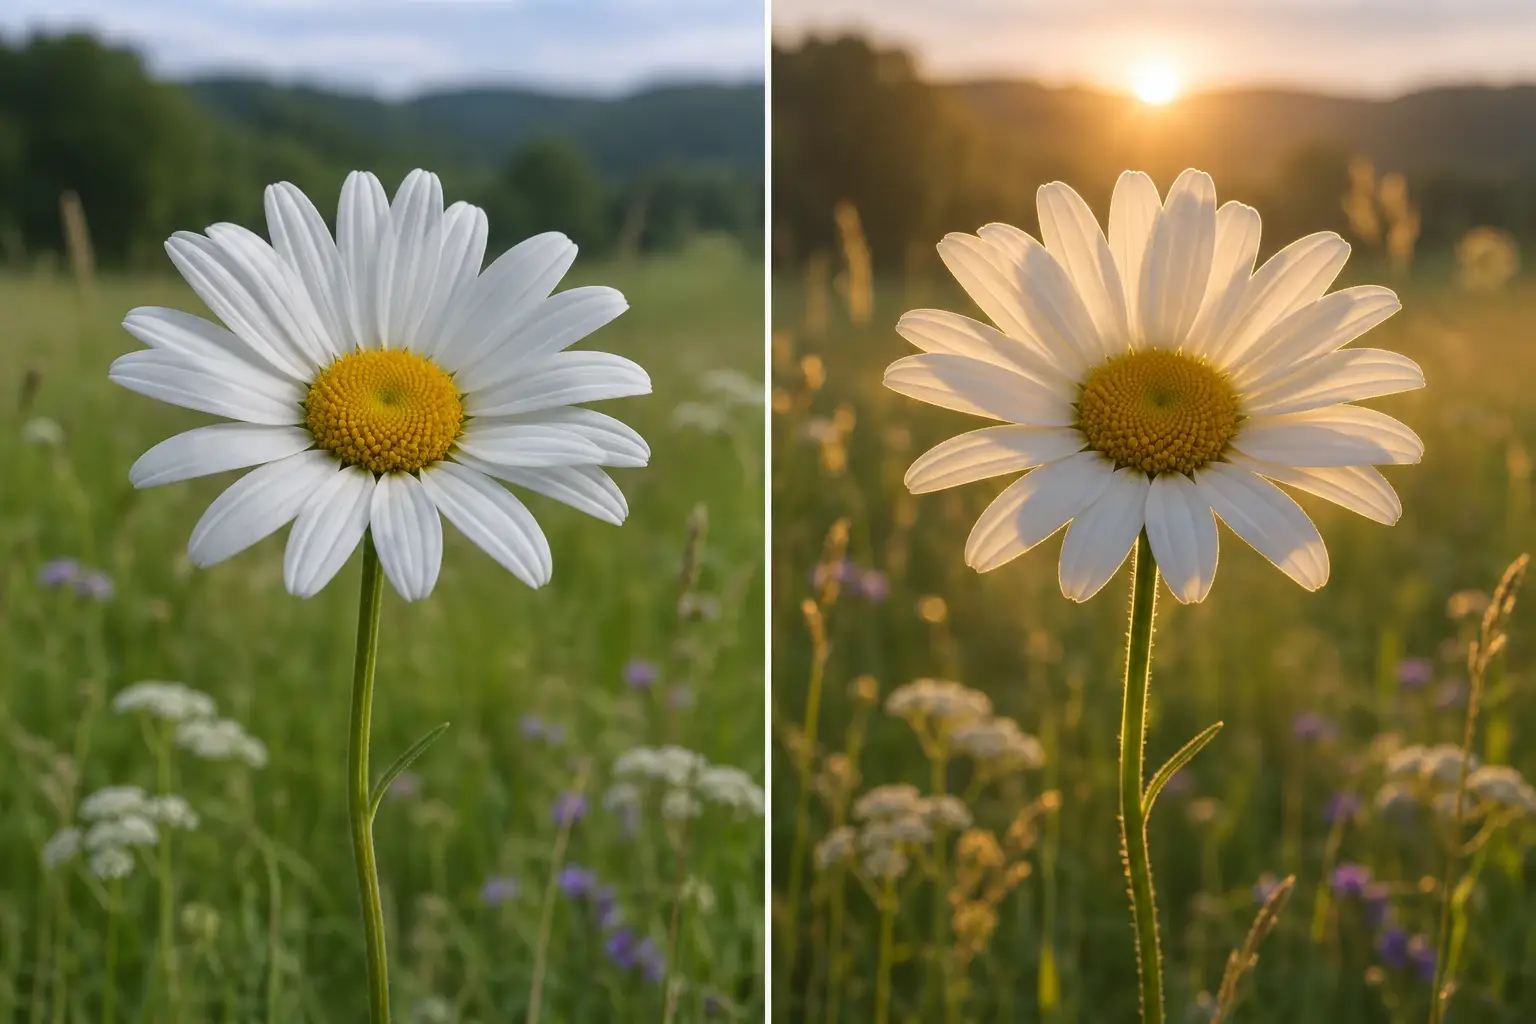
A low bright source gives the petals a warm glow and leaves the center partly shaded. Some petals and meadow highlights shift.
10. /dramatic-light: Build a controlled dramatic look
Lighting objective. Use a local shaft of light to direct the eye.
Choose a clear key direction, deeper shadows and a readable eye. The word dramatic becomes more useful when the prompt describes the actual contrast pattern.
Edit prompt used
Use the attached image as the source image and edit target. Change only the illumination to a directional neutral key from high frame right with deep controlled shadow on the opposite cheek and a dark background; retain a small readable catchlight and natural skin tone, without horror effects. Preserve the fictional woman's facial proportions, expression, brown eyes, freckles, short brown wavy hair, charcoal shirt, pose and plain background, the original camera position, perspective and landscape crop. Adjust the existing shadows, highlights, reflections and colour cast to match the requested lighting. Keep the subject recognizable and important detail readable. Apply changes only to surfaces and light; do not add or remove objects, people, signs, words, logos or watermarks. Return one landscape 3:2 image. This is an illustrative relighting edit, not evidence of real lighting conditions or an unchanged photograph.
/dramatic-light — original generated input
The unchanged portrait reference supplied to this edit.
/dramatic-light — relit result
The right side is lit against a much darker background, with deep shadow across the opposite cheek and a visible eye catchlight.
What changed
The right side is lit against a much darker background, with deep shadow across the opposite cheek and a visible eye catchlight. The overall face and pose stay recognizable. Contrast changes the perceived facial shape, and fine skin texture differs from the input.
Mountain valley lighting example
Find the illuminated ridge first, then check that the shadowed valley and skyline still retain detail.
Prompt to try on your own image
Use the attached image as the source image and edit target. Change only the illumination to a single visible shaft of warm sunlight through an existing cloud gap, striking one ridge while the foreground stays in deep but legible shade. Preserve summit outline, ridges, trees, camera position and cloud layout, the original camera position, perspective and landscape crop. Adjust the existing shadows, highlights, reflections and colour cast to match the requested lighting. Keep the subject recognizable and important detail readable. Apply changes only to surfaces and light; do not add or remove objects, people, signs, words, logos or watermarks. Return one landscape 3:2 image. This is an illustrative relighting edit, not evidence of real lighting conditions or an unchanged photograph.
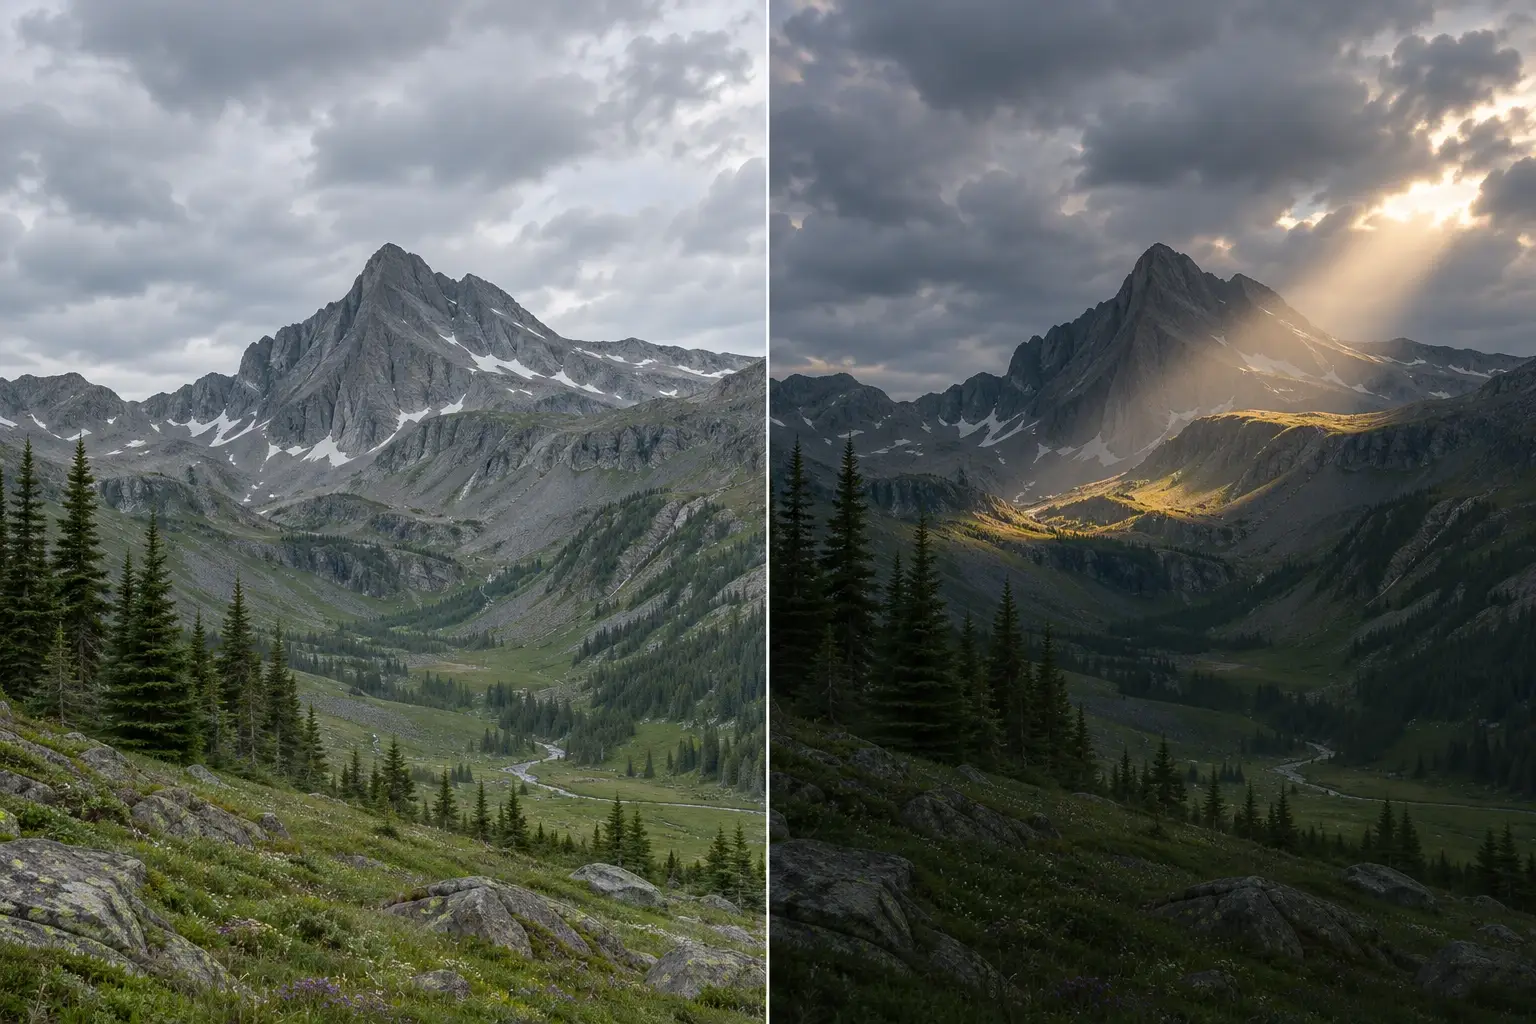
The bright shaft leads to one ridge. Some cloud shapes and fine terrain details differ.
What the comparison tells us
The strongest visual differences here came from specifying where the light sits and how much shadow to retain. The hard-light version has a defined nose shadow, rim light outlines one side, and backlight produces a broader halo with a darker face. Soft light and window light look similar because the instructions overlap and the baseline was already softly illuminated.
Use the shadow pattern and the position of the highlights to judge whether the light did what you asked. Small changes in hair, skin detail, eye appearance and product reflections remain visible even when preservation is requested. If a result looks attractive, still check whether it represents your subject faithfully.
For generating a portrait from a written brief, see our 20 portrait-lighting ideas. To refine visible boundaries or surface detail, use the ten image-detail comparisons. For another lighting attempt, start with the editable relighting prompt, keep one input and change one lighting instruction.
AI assistance supported research, writing and editorial revision. Every displayed example is generated media. The recorded comparisons use synthetic inputs. Each scene illustration was generated as a two-panel image, and its suggested upload edit has not been tested. No sponsorship or affiliate links are included.
Sources
- Image generation guidance — OpenAI
- Image prompting guide — OpenAI
- Portrait photography lighting guidance — Adobe